Just another WordPress site

Day: July 8, 2023

Basic SSH Commands That You Should Know About

Basic SSH Commands That You Should Know About

Basic SSH Commands That You Should Know About

In this tutorial, we are going to cover 17 basic SSH commands that you should know about. By learning them, you will understand how to navigate and manage your VPS or server using the command line.

How to Access Remote Server

Before we begin, make sure that you have access to a remote server. If you own a VPS or Dedicated server, the login details are emailed to you by your hosting provider.

Pro Tip

SSH stands for Secure Shell, a protocol used to securely connect to a remote server or system. If you want to learn more about it, Hostinger has a detailed tutorial on how SSH works.

Now let’s start accessing your remote server:

  1. There are two recommended methods to establish an SSH connection:
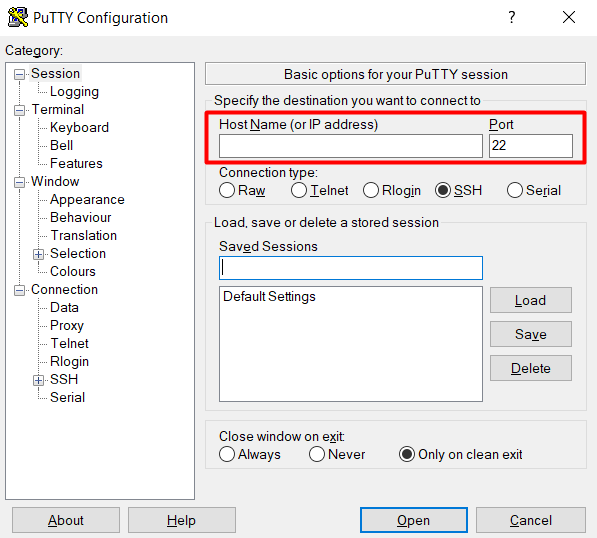
    • Using an SSH client (PuTTY). It will require you to enter the server’s IP and the port number into the corresponding fields.
      The fields in PuTTY where you need to enter your server's IP address and port
    • Using the built-in command prompt (Windows) or terminal shell (Linux, macOS). You will need to write:
      ssh user@serverip

      Remember to replace “user” with your real username and “serverip” with your server’s dedicated or shared IP address.

  2. Once you click the Open button on PuTTY or enter the command on the terminal, you will be prompted for a password. If you are connecting to the server for the first time, you might get a warning message, telling you that the server is not recognized. Just hit Yes to continue.

That’s it. Now you’re connected to the server and can start executing SSH commands.

List of Basic SSH Commands

In this part, we will go through popular SSH commands, complete with their syntaxes and useful options.

Here’s a quick look of the basic SSH commands that we’ll cover in this article:

SSH Command Explanation
ls Show directory contents (list the names of files).
cd Change Directory.
mkdir Create a new folder (directory).
touch Create a new file.
rm Remove a file.
cat Show contents of a file.
pwd Show current directory (full path to where you are right now).
cp Copy file/folder.
mv Move file/folder.
grep Search for a specific phrase in file/lines.
find Search files and directories.
vi/nano Text editors.
history Show last 50 used commands.
clear Clear the terminal screen.
tar Create & Unpack compressed archives.
wget Download files from the internet.
du Get file size.

1. ls Command

This SSH command is used to list all files and directories. After entering ls, you will see an output that looks like this:

The output of ls command

There are also a few useful options that you can combine with it:

  • -l —  displays the details of the files, such as size, modified date and time, the owner, and the permissions.
  • -a —  shows hidden files and directories.

2. cd Command

cd (Change Directory) is the command that we use to jump between directories. It’s a pretty simple command — just type cd followed by the name of the directory:

cd [directory]

As such, if you want to enter the home directory of your server, you can type:

cd home

You may also write the full path of a certain directory if it is a few levels deep. For instance:

cd home/TestDirectory/AnotherDirectory

You are now in the AnotherDirectory.

To go back one level, you can simply enter “..” (two dots) after cd command. What’s cool, you can go back further by adding another two-dots and separating them with a forward slash (/):

cd ../..

By entering this line, you are in the home directory again.

3. mkdir Command

You can use mkdir (Make Directory) command to create a directory. This is the syntax:

mkdir [folder name]

Let’s assume you want to create a new folder named “myfolder”. You will need to type:

mkdir myfolder

4. touch Command

This SSH command is used to create a new file. Here is the syntax:

touch [file name]

If you want to create a .txt file named “myfile”, this is what you need to write:

touch myfile.txt.

The file extension could be anything you want. You can even create a file with no extension at all.

5. rm Command

rm command removes a chosen file or directory. To delete a file, enter:

rm [file name]

For instance, if you want to remove myfile.txt, simply execute:

rm myfile.txt

To delete a folder, you need to use the -r option to remove all the files and subfolders inside it:

rm -r home/hostinger/myfolder

6. cat Command

We use cat command to display the content of a file. Below is the syntax:

cat [file name]

It also allows you to create a new file by merging multiple files. For example:

cat info.txt info2.txt > mergedinfo.text

By executing this line, the content of info.txt and info2.txt will be saved into mergedinfo.txt.

7. pwd Command

pwd is a simple command that outputs the full path of your working directory. Once entered, you should see a result like this:

home/user/public_html

pwd command can come in really handy when you are accessing your site hosting account through SSH. Oftentimes, shared servers don’t tell you the directory you are in.

8. cp Command

This SSH command will copy files and folders. The syntax is:

cp [options] [source] [destination]

[source] is the file or folder you want to copy and [destination] is the duplicate.

Let’s say you have myfile.txt in your working directory, and you want to make a copy of it. The syntax would be:

cp myfile.txt myfile2.txt

If you want to make a copy in a different folder, run the following command:

cp /home/hostinger/myfile.txt /home/etc/

Be careful when writing the name of the destination. If you provide two file names, the cp command will copy the content of the source file into the destination file. Thus, the destination file will be overwritten without any warning. However, if the destination file doesn’t exist, then the command will create a new file.

[options] is not mandatory. However, there are several options that you can use:

  • -f — if you don’t have writing permission to the destination file, it’ll be deleted and the command will create a new file
  • -u — copy the source file if it is newer than the destination file.
  • -n — will not overwrite an existing file.
  • -a — archive the files.

Unlike duplicating files, copying folders requires you to use the -R (recursive) option. The option allows all folders and files inside it to be copied.

cp -R /home/hostinger/myfolder /home/etc/

9. mv Command

This command works similarly to cp. However, mv command will move the file or folder instead of copying it. This is the syntax:

mv [source] [destination]

Let’s say we want to move myfile.txt from /home/hostinger/ftp to /home/hostinger/myfolder/. The command should be:

mv /home/hostinger/ftp/myfile.txt /home/hostinger/myfolder

Unlike cp command, you don’t need the -R option to move a folder. For instance:

mv /home/hostinger/ftp/ /home/hostinger/myfolder/

This will automatically move all files and subfolders inside ftp to myfolder.

10. grep Command

grep command looks for a given string in files. For example:

grep 'line' info.txt

The above command would search for ‘line’ in a file named “info.txt”. What’s great, the command will print the entire line that contains the matched text.

The results of grep SSH command

Keep in mind that this command is case sensitive. If you want to ignore letter cases, use -i option.

11. find Command

We enter find SSH command to search for a file or files that meet the given criteria (name, size, file type, etc). The following is the basic syntax:

find [starting directory] [options] [search term]

[starting directory] is where you would like to start your search process. There are three main choices:

  • / (slash) — search the whole system
  • . (dot) — search the working directory
  • ~ (tilde) — search the home directory

[options] is an additional argument that you can use to refine your search. Some of the most popular options are:

  • -name — look for files based on their names
  • -user — search for files that belong to a given user
  • -size — look for files based on their sizes

[search term] is the keyword or number that you use to search for files.

Take a look at this example:

find . -name “index”

This command will return any files that have the word “index” on their names. And since we use “.” (dot), the command will only search the working directory.

We also have a great tutorial that provides an in-depth explanation about this SSH command.

12. vi/nano Command

Vi and Nano are two popular text editors that you can use in the command line. To open a file using Vi or Nano, you just need to enter:

vi [file name]

or

nano [file name]

If the specified file doesn’t exist, both text editors will automatically create it for you.

Unfortunately, some Linux distributions don’t offer Nano by default. Don’t worry, you can read our guide on how to install and use Nano.

13. history Command

This one is used to display the last used commands. You need to enter a number to limit the displayed results. For example:

history 20

As you probably guess, the example will show the 20 most recently entered commands.

14. clear Command

The function of clear command is simple — it clears all text from the terminal screen.

15. tar Command

tar is an SSH command that creates or extracts .tar.gz files. It is very popular because most third-party software binaries are in the .tar.gz format.

To archive a folder in .tar.gz format, use the following command:

tar cvzf ArchiveName.tar.gz /path/to/directory

To unpack a .tar.gz file, enter this command:

tar xvzf FileName.tar.gz

Notice that both commands use different four-character options — cvzf and xvzf.  Each letter represents a specific instruction:

  • x tells tar to extract files
  • c tells tar to create an archive
  • v stands for verbose. The option tells tar to display all file names that are processed by the command.
  • z instructs tar to uncompress the archive
  • f tells tar that you are supplying the name of the archive

16. wget Command

wget is used to download files from the internet. For example, to fetch a file from a website and store it in our current directory, we’ll use:

wget http://fileurl/filename.ext

If you want to download multiple files, put all URLs into a file and use the -i option.

Let’s say the file containing the links is called downloads.txt. The command will look like this:

wget -i downloads.txt

17. du Command

You can use du (Disk Usage) command to view the size of files and folders in a specified directory:

du [directory path]

Unfortunately, the summary will show disk block numbers instead of bytes, kilobytes, and megabytes. Therefore, to show it in a human-readable format, you need to insert the -h option after du command:

du -h /home

The results will be more understandable:

The results of du command

Check out this article to read more about du command.

How to Install FFmpeg on Linux, macOS, and Windows

How to Install FFmpeg on Linux, macOS, and Windows

FFmpeg is a cross-platform application that manages various types of multimedia files. The tool contains a set of shared audio and video libraries such as libavformat, libavutil, and libavcodec.

Furthermore, it decodes, encodes, mux, demux, streams, filters, plays, and transcodes media files. When converting video and audio files using FFmpeg, the tool will auto-detect the input and output formats.

FFmpeg is available as a command-line tool and supports different operating systems. In this article, we will explain how to install FFmpeg on Linux, macOS, and Windows.

If you want to install FFmpeg on your Linux VPS, connect to your machine via SSH before proceeding further.

How to Install FFmpeg on Linux

In this section, we will explain how to set up FFmpeg on popular Linux distributions like Ubuntu, Debian, CentOS, Fedora, and RHEL.

Installing FFmpeg on Ubuntu

There are two methods to install FFmpeg on Ubuntu – via the Personal Package Archives (PPA) and the default repository. The former contains a collection of software managed by the Ubuntu community and works best on Ubuntu 18.04 and older versions.

However, the installation must be done via the default repository if your machine runs Ubuntu 20.04 or 22.04.

Ubuntu 18.04

Here’s how to install FFmpeg via the PPA:

  1. Open the Terminal and log in as a root user.
  2. Install the software-properties-common package. This will allow you to manage the repositories you install the application from:
sudo apt-get install software-properties-common
  1. Once done, add mc3man PPA by adding the following command:
sudo add-apt-repository ppa:mc3man/trusty-media
  1. After the PPA is installed on the system, update the repository by running these commands consecutively:
sudo apt-get update
sudo apt-get dist-upgrade
  1. Next, install FFmpeg by typing in the command below:
sudo apt-get install ffmpeg

Ubuntu 20.04

Follow these steps to install FFmpeg via the default repository:

  1. Open the Terminal and access it via a root user.
  2. Update the system and packages installed by running both commands consecutively:
sudo apt update
sudo apt upgrade
  1. Insert the command below to install the FFmpeg application:
sudo apt install ffmpeg

Installing FFmpeg on Debian

There are two ways to install FFmpeg on Debian – via the default and multimedia repositories.

The former method serves Debian 9 and newer versions, while the latter applies to Debian 8 and older versions.

Debian 9

Here’s how to install FFmpeg using the default repository:

  1. Open the Terminal and log in via a root user.
  2. Update the package list and system by running both commands consecutively:
sudo apt update
sudo apt upgrade
  1. Next, install FFmpeg by adding the command below:
sudo apt install ffmpeg

Debian 8

FFmpeg is unavailable in the official Debian 8 or older repository. Therefore, users must add the Debian multimedia repository to install the codex by editing the sources.list file that contains the list of repositories the APT uses.

Follow these steps to install FFmpeg using the multimedia repository:

  1. Launch the Terminal and log in as a root user.
  2. Next, open the source.list file by typing in the following command. Use an editor such as nano or vi:
sudo vi /etc/apt/source.list
  1. Press I to enter Insert mode and start editing.
  2. Add the following lines at the end of the file:
# deb-multimedia
deb http://www.deb-multimedia.org jessie main non-free
deb-src http://www.deb-multimedia.org jessie main non-free
# jessie-backports
deb http://httpredir.debian.org/debian/ jessie-backports main
  1. Save the file by pressing ESC and close the file by pressing : (colon) and q!
  2. Finally, update the system by typing in the command below:
sudo apt update
  1. Insert this command to install the deb-multimedia-keyring package:
sudo apt install deb-multimedia-keyring
  1. Update the system once again to ensure the changes were saved by running the command below:
sudo apt update
  1. Once finished, install the FFmpeg package by typing in the command below:
sudo apt install ffmpeg

Installing FFmpeg on CentOS, Fedora, and RHEL

FFmpeg package is not available in the official repository of CentOS, Fedora, and RHEL. Therefore, users need to install it using an additional repository.

CentOS 7

Here’s how to install FFmpeg on CentOS 7 using the Nux Dextop repository:

  1. Open the Terminal and log in as a root user.
  2. Install the EPEL repository by typing in this command:
sudo yum install epel-release
  1. Update the system and packages by running the following command:
sudo yum update
  1. Use these commands to install the Nux Dextop repository:
sudo rpm --import http://li.nux.ro/download/nux/RPM-GPG-KEY-nux.ro
sudo rpm -Uvh http://li.nux.ro/download/nux/dextop/el7/x86_64/nux-dextop-release-0-5.el7.nux.noarch.rpm
  1. Finally, type in this command to install the FFmpeg and its development package:
sudo yum install ffmpeg ffmpeg-devel -y

RHEL 7/8

Follow these steps to install FFmpeg on RHEL 7/8 via the RPM Fusion repository:

  1. Open the Terminal and access via a root user.
  2. Type in the command below and press Enter to update the system:
sudo yum update
  1. Install the EPEL repository by inserting this command and hitting Enter:
sudo yum install epel-release
  1. Next, run either of these commands to install RPM fusion:

RHEL 7

yum localinstall --nogpgcheck https://download1.rpmfusion.org/free/el/rpmfusion-free-release-7.noarch.rpm https://download.rpmfusion.org/nonfree/el/rpmfusion-nonfree-release-7.noarch.rpm

RHEL 8

yum localinstall --nogpgcheck https://download1.rpmfusion.org/free/el/rpmfusion-free-release-8.noarch.rpm https://download.rpmfusion.org/nonfree/el/rpmfusion-nonfree-release-8.noarch.rpm
  1. Install FFmpeg and its development packages by typing in the following command
sudo yum install ffmpeg ffmpeg-devel -y

Fedora

Here’s how to install FFmpeg on Fedora using the RPM Fusion repository:

  1. Open the Terminal and log in as a root user.
  2. Update the system by inserting the following command:
sudo dnf update
  1. Add the RPM Fusion repository to install FFmpeg by running the command below:
sudo dnf install https://download1.rpmfusion.org/free/fedora/rpmfusion-free-release-$(rpm -E %fedora).noarch.rpm https://download.rpmfusion.org/nonfree/fedora/rpmfusion-nonfree-release-$(rpm -E %fedora).noarch.rpm
  1. Update the system once again to make sure the changes were saved by running the following command:
sudo dnf update
  1. Next, install FFmpeg and its development package by inserting this:
sudo dnf install ffmpeg ffmpeg-devel

Installing FFmpeg on Arch Linux

The official Arch Linux repository, the Packman package manager, provides the FFmpeg codex on their system. Here’s how to install it:

  1. Open the Terminal and log in to a user account with sudo privileges.
  2. Update the system packages by running the following command:
pacman -Syu
  1. Type in the command below to install FFmpeg:
sudo pacman -S ffmpeg
  1. Next, install the development package by inserting the following commands consecutively:
yay -S ffmpeg-git
yay -S ffmpeg-full-git
  1. Update the system once again by running this command:
pacman -Syu

Verifying the FFmpeg Installation

To verify the FFmpeg installation and check what version is running on the machine, insert the following command:

ffmpeg -version

The output should look as shown below:

Verifying the FFmpeg version on Linux

How to Install FFmpeg on macOS

Follow these steps to set up FFmpeg on macOS:

  1. Download the FFmpeg package from the official website.
  2. Choose the Static builds for macOS 64-bit. This will redirect you to the evermeet.cx site.
  3. Select the ffmpeg-5.0.1 version.
  4. Open the downloaded file. This will extract it using the Archive Utility and create an executable FFMpeg file.
Extracting FFmpeg using the Archive Utility tool on macOS
  1. Launch the Home folder by opening Finder and using the keyboard shortcut CMD + Shift + H, or clicking the Go button on the menu bar and clicking Home.
  2. Go to File and click the New folder. Rename it to audio-orchestrator-ffmpeg and press Return to confirm the change.
  3. Open the newly added folder and create a new folder labeled bin.
  4. Move the FFmpeg file from Downloads to the newly created bin folder.
  5. Double-click to open the FFmpeg file. When the “ffmpeg” can’t be opened because it is from an unidentified developer.” message appears, press OK.
FFmpeg error message on macOS
  1. Go to System Preferences and select Security and Privacy.
  2. Choose the General tab.
  3. When a new error message appears, click Open Anyway.
macOS security and privacy window
  1. Another pop-up will appear stating that “macOS cannot verify the developer of “ffmpeg”. Are you sure you want to open it?”. Click Open.
macOS security verification window
  1. Double click the FFmpeg file, and a new Terminal window will open. Close it only when the process is complete.
FFMpeg installation process on macOS
  1. Congratulations, you have successfully installed FFmpeg.

How to Install FFmpeg on Windows

Before the installation process, it is vital to have a ZIP file utility installed on your system. Here’s how to install FFmpeg on Windows:

  1. Download the FFmpeg package from the official website.
  2. Choose the Windows builds from gyan.dev. This will redirect you to the gyan.dev website.
  3. Select the ffmpeg-git-full.7z version.
  4. Once downloaded, right-click the FFmpeg folder and select Extract files.
  5. Once done, open the extracted folder and copy and paste all the EXE files from bin to the root folder of your hard drive. For example, create a separate folder on the Local Disk (C:) to store all the files.
A separate folder for FFmpeg .exe files
  1. Type “environment properties” on the search tab and click Open.
  2. This will open the System Properties window. Go to the Advanced tab and choose Environment Variables…
System properties information on Windows
  1. Go to the System variables section. Select Path from the list and click Edit.
User and system variables information on Windows
  1. Choose New and add the FFmpeg path of the folder you have created previously to store the EXE files.
Adding a new path on environment variable on Windows
  1. Once done, click OK to save your changes. This will close the Edit environment variable window.
  2. Select OK to close the Environment Variables window and click OK once again to close System Properties.
  3. Open the Command Prompt window or type “cmd” in the search tab.
  4. Run the following command to verify that FFmpeg is installed:
ffmpeg
  1. The following output should appear, showing the FFmpeg version and default configuration settings:
Checking the FFmpeg installation on Windows
  1. Congratulations, You have successfully installed the FFmpeg application on your system.